
Microsoft Defender, introduced first in Windows XP in 2005 by Microsoft Corporation, is a built-in anti-spyware program. It provides protection against a wide range of threats such as viruses, malware, and phishing attacks. It provides the best services for Windows, macOS, Android, and iOS devices.
Microsoft Windows Defender can be disabled temporarily or permanently with different methods. The primary reason for permanently disabling Windows Defender in Windows 10 or 11 is that it can slow down the speed of the system. In case of temporary disable, it will turn on automatically after some time. Hence, frustration can be solved only with permanent disable.
Turning off Windows Defender Antivirus protection should be cautiously approached, as it exposes your computer to potential security risks. In certain instances, Microsoft Defender is a vigilant gatekeeper for your system, scrutinizing programs and tools before running or installing. Sometimes to run any third-party application or tool you have to disable Windows Defender.
Note: Before you decide to use Windows Defender Disable, consider the potential risks and alternative security solutions in place. Regularly re-enable Windows Defender Antivirus to maintain a secure computing environment.
Permanently Disable Windows Defender
Microsoft Defender has undergone over 500 updates to stand as a fortified fortress against old and newly evolving malware. It also saves $60 per year for individuals, to neutralize more than 10 million distinct malware threats annually, that might otherwise be allocated for third-party antivirus applications.
Anyhow, for some reason, if you still eagerly need to turn off Microsoft Defender Permanently, we will assist you with 5 different methods. There are many Windows Defender disable tools that are very easy to use.
Let’s discuss some newly unique methods and apply them by using Windows Security settings. All the associated protection measures will be disabled with disabled Windows Security. Moreover, these methods are applicable to both Windows 10 and 11.
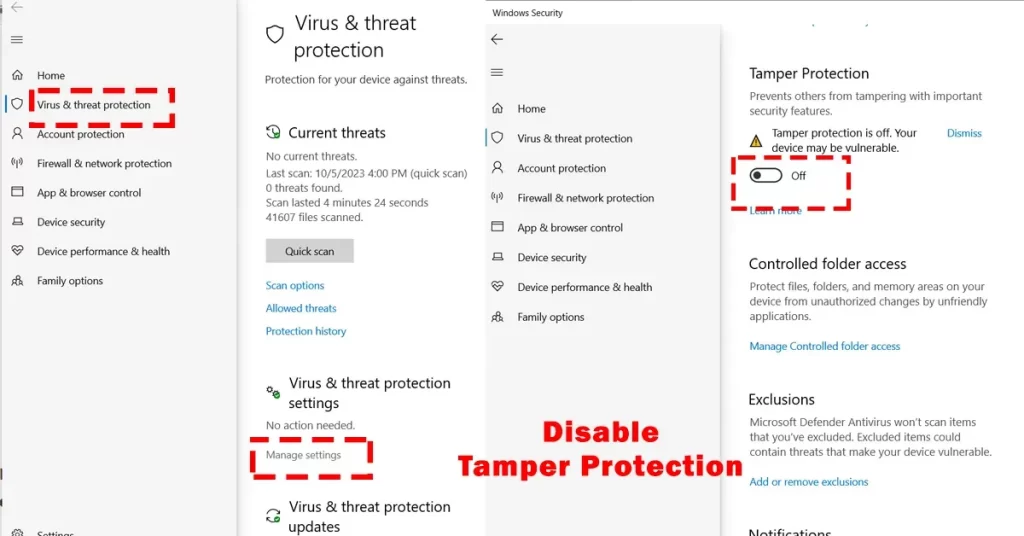
Step 1: Windows Defender Tamper Protection
Before going any further, must do 1 most important step; Disable Tamper Protection. Tamper Protection prevents unauthorized changes to critical security settings, so to apply any method first of all Disable Real-Time Protection or Tamper Protection Disable by following these simple steps:
- Open the security software’s settings or configuration interface.
- Locate the section related to Tamper Protection or security features.
- Toggle off or disable the Tamper Protection feature.
- After completing the necessary tasks, re-enable Tamper Protection is advisable to restore your system’s full security integrity.
Method 1. Disable Microsoft Defender Using Group Policy Editor
The Group Policy Editor (GPE) offers a powerful means to manage various system settings and configurations in Windows. If you need to disable Microsoft Defender’s real-time protection using the Group Policy Editor, follow these steps:
Step 1: Open Local Group Policy Editor
Press Win + R to open the Run dialog. > Type gpedit.msc and press Enter > Local Group Policy Editor Opened.
Step 2: Open Microsoft Defender Antivirus
In the Group Policy Editor window > navigate to Computer Configuration > Administrative Templates > Windows Components > Microsoft Defender Antivirus.
Step 3: Turn Off Antivirus
Look for the policy named “Turn off Microsoft Defender Antivirus” > to modify it “Double-click on the policy”.
Step 4: Enable Policy
In the policy settings window, select the “Enabled” option > Click OK to apply the change.
Step 5: Reboot
To ensure that the policy takes effect, restart your computer.
These are really the simple steps, which can effectively disable Microsoft Defender permanently until you activate it again manually to Default. When your personal work is done, you can re-enable it within no time! That’s all depends on you.
Method 2. Disable Microsoft Defender Using Registry Editor
The Windows Registry Editor, a highly detailed storage system, lies at the core of Windows operating systems. The Windows Registry database, a few megabytes to around 100 megabytes, has over 3,000 distinct keys for system configuration and fine-tuning for Windows functions and behavior.
It must be noted that the Windows Registry Editor is accessed via the “regedit” command when it is searched in the Run Search Bar. One more thing, make sure that create a backup of the registry, so in case of any miscreation, you have a restore point. Now follow these steps to disable Windows Defender with Registry Editor.
Step 1: Open Editor Interface
To open the Registry Editor, press Win + R, type “regedit,” and hit Enter. This action launches the Editor interface.
Step 2: Update Registry Editor
Within the Registry Editor, navigate to HKEY_LOCAL_MACHINE\SOFTWARE\Policies\Microsoft\Windows Defender. This location contains configurations related to Microsoft Defender.
Step 3: Modify DisableAntiSpyware
If you don’t find the key named DisableAntiSpyware within the right-hand pane, you can create it. Right-click on an empty area, select New > DWORD (32-bit) Value, and name it DisableAntiSpyware. Double-click on it to modify its value.
Step 4: Update Value Data
In the Edit DWORD Value window, set the value data to 1. This effectively disables Microsoft Defender’s real-time protection.
Step 5: Restart System
Restart your computer so the system gets updated.
Note In case, you want to disable for a couple of hours to install any third-party application or program then it is also possible to reverse to standard. To re-enable Microsoft Defender, navigate back to the same registry key and set the DisableAntiSpyware value to 0 or delete the key. Restart your computer for the changes to apply.
Method 3. Disable Microsoft Defender Using CMD
Command Prompt (CMD or cmd.exe) is a text-based interface that interacts in the command line format with the computer. By writing simple commands like C:\> you can perform various tasks as a system admin. To access the command prompt and run the command prompt you need to follow the following steps:
Step 1: How to Use Command Prompt
With keyboard shortcuts and text-based input, you can easily open the command prompt.
- Press Win + R, this keyboard shortcut opens the Run dialog.
- Type “cmd”: In the Run dialog, type “cmd” (without the quotes).
- Press Enter or Ctrl + Shift + Enter: After typing “cmd,” you can either press Enter on your keyboard or click the “OK” button in the Run dialog.
Step 2: Run CMD as Administrator
Write a command line as administrator, after the word C:/Windows/system32 and press enter. For your ease, just copy this command line and paste it into the command prompt.
reg add “HKEY_LOCAL_MACHINE\SOFTWARE\Policies\Microsoft\Microsoft Defender” /v DisableAntiSpyware /t REG_DWORD /d 1 /f
On the successful completion of a command A, you’ll receive a line The operation completed successfully.
Step 3: Boot System
If you don’t want to give another command i.e. command B or command C then exit the command prompt. Restart your system, and Windows Defender automatically turned off.
Method 4. Disable Microsoft Defender Using Winaero Tweaker
Winaero Tweaker, a third-party app for making adjustments in the Windows operating system, allows you to disable Microsoft Defender without Windows settings and a control panel. Moreover, it can also configure Windows Update settings and other security-related features.
Follow these simple steps to turn off Windows Defender in Windows 10 and 11:
Step 1: Download and Install Winaero Tweaker
- Visit the official Winaero Tweaker website or a trusted source
- Download the Winaero Tweaker application
- Install the application by following the on-screen instructions
Step 2: Disable Tamper Protection in Windows Security
- Open the Windows Security app. You can do this by searching for “Windows Security” in the Start menu or using the Windows Security icon in the system tray (taskbar notification area)
- Within Windows Security, navigate to the “Virus & Threat Protection” section
- Find and select the “Manage settings” link
- Scroll down to the “Tamper Protection” option and turn it off. Confirm any prompts that may appear
Step 3: Return to Winaero Tweaker
- After disabling Tamper Protection in Windows Security, return to the Winaero Tweaker application
- In the Winaero Tweaker application, locate and click on the “Windows Defender” section in the left panel
- Within the Windows Defender section, look for the “Disable Defender” option
- Check the “Disable Defender” option to enable it
Step 4: Reboot the System
- In the down left corner, click on the Reboot Now button
- After restarting, it permanently disabled Defender in Windows 10 and 11
Method 5. Disable Microsoft Defender Using Ultimate Windows Tweaker
Ultimate Windows Tweaker (UWT), a free and powerful tool for Windows, allows permanent disable Microsoft Defender in a few steps. Moreover, it is also used for adding tweaks to the new operating system, which helps make your system faster with a single UI. Now, follow these simple steps:
Step 1: Download and Install Ultimate Windows Tweaker
- Download Ultimate Windows Tweaker from a trusted source or the official website
- Install the application by following the on-screen instructions
Step 2: Open Ultimate Windows Tweaker
- Launch Ultimate Windows Tweaker from your desktop or Start menu
- Navigate to the Security & Privacy Section
- In Ultimate Windows Tweaker, look for a section related to “Security & Privacy” or “Windows Defender”
Step 3: Disable Windows Defender
- Within the “Security & Privacy” section, you should find an option related to Windows Defender
- Depending on the version of UWT you’re using, you may have the option to disable Windows Defender or to tweak its settings
- Locate the option to disable Windows Defender and enable it. Follow any prompts or instructions that may appear
Step 4: Apply Changes and Restart
- After disabling Windows Defender, apply the changes within Ultimate Windows Tweaker
- You may be prompted to restart your computer for the changes to take effect. If prompted, go ahead and restart your system
Frequently Asked Questions
How to Turn Off Windows Security?
To turn off Windows Security, including Windows Defender, you can open the “Windows Security” app, navigate to “Virus & threat protection settings,” click “Manage settings” under “Real-time protection,” and toggle the switch to disable “Real-time protection.”
How to Turn on Windows Defender in Windows after Disable?
To turn on Windows Defender in Windows after disabling it, open the “Windows Security” app from the Start menu, go to “Virus & threat protection settings,” click “Manage settings” under “Real-time protection,” and toggle the switch to enable “Real-time protection.”
Do I Need Antivirus Software if I have Windows Defender Disable?
Microsoft Defender can be disabled in Settings but will turn back on automatically when you restart your computer. If you want to turn off Defender permanently, you’ll need to install a different antivirus program. You can also use the built-in Group Policy Editor to permanently turn off Defender.
Bringing It Together
Disabling Microsoft Defender on your system can indeed be a challenging task due to the robust security measures built into Windows Security. One of the first hurdles to overcome is Tamper Protection, a feature designed to prevent unauthorized changes to Defender settings. Disabling Tamper Protection is the initial step to gaining more control over your antivirus preferences.
Once Tamper Protection is disabled, you may proceed with caution to disable Microsoft Defender if you prefer using a third-party antivirus solution. Keep in mind that disabling Defender should not be taken lightly, as it leaves your system without real-time protection against known threats. It’s strongly recommended to replace Defender with a reliable alternative to maintain your system’s security.
Third-party antivirus software can provide robust protection while allowing you more flexibility in managing your antivirus preferences. Be sure to choose a reputable antivirus program with a proven track record of malware detection and prevention.
In conclusion, while it’s possible to disable Microsoft Defender on your system after turning off Tamper Protection, it’s essential to do so cautiously and with a clear understanding of the potential risks. If you decide to go this route, replace Defender with a trustworthy third-party antivirus solution to ensure your system remains safeguarded against malware threats.
This is how to permanently disable Windows Defender In Windows 11 & 10 with simple 5 methods.
Last modified: October 11, 2023